I often get asked how to print in metallic
gold foil at home. Although you can't print directly in metallic gold
from any home inkjet or laser printer, there are a couple of ways you
can add gold foil to your DIY wedding invitations right at home. Source.
Being the thrifty lady that I am, this first method is the least expensive one out there. to get started you will need:
1. Inexpensive Laminator. I found this one for under $20 on amazon
2. Deco Foil. Available in many colors, also on amazon. $6-7 for 5 6x12 sheets
3. Laser printer. You can print on your own laser printer at home like I did, or use a place like staples. Inkjet prints will not work.
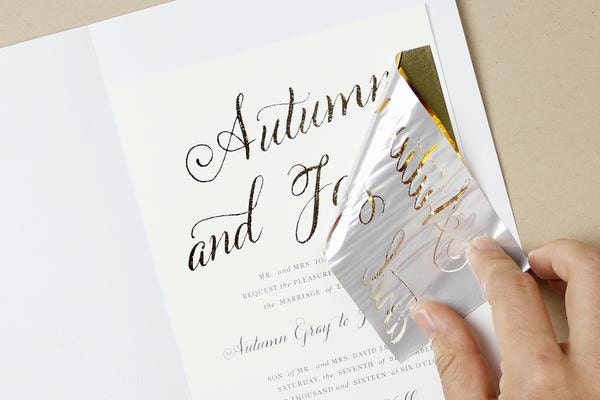
I then trimmed the design using a paper cutter.Next, I cut a piece of gold foil to size and laid it on top of the part of the image I wanted foiled. The foil will stick to any printed area, so make sure your foil isn't covering any other text.
This is the main factor in the cost of your DIY invitation, the more foil, the more expensive. This amount of coverage allows me to get 25 invitations our of each roll of foil, costing me .30 cents an invitation for the foil.
I then took a regular piece of text weight copy paper and folded it in half. Place your invitation with the gold foil on top inside the paper folder. Place the folder insider the laminator. I had mine on the 5mil, high heat setting. You may need to use the lower setting depending on how thick your card stock is.
The invitation will take about 30 seconds to run through the machine. Finally, open the folder and peel away the foil! I found that smooth paper gives the best foil coverage. The resulting foil will not chip, flake, or rub off.
Check out the video at the top of the post or on Instagram to see it shine. I couldn't believe how easy this was and how well the foil stuck!
I'm glad it was only $28 bucks to pick up the supplies and give it a shot. Until I heard of this method I had been considering the Minc, a $150 foil machine from Heidi Swapp. Besides the expensive price of the machine, the foil sheets are also much more pricey. Using her machine would pretty much negate any cost savings from DIY, so I'm not going to review it.
Sure, the $20 laminator isn't as cute as the Minc - but it does the trick!
I'll break down the final cost for 100 DIY gold foil invitations using this method and laminator for those budget savvy brides out there:
Paper Source Cardstock: .19 cents per invitation
Foil: .30 cents per invitation
Laminator: 19.95
Total cost for 100 invitations including supplies: $68.95 or .69 cents an invitation!
Being the thrifty lady that I am, this first method is the least expensive one out there. to get started you will need:
1. Inexpensive Laminator. I found this one for under $20 on amazon
2. Deco Foil. Available in many colors, also on amazon. $6-7 for 5 6x12 sheets
3. Laser printer. You can print on your own laser printer at home like I did, or use a place like staples. Inkjet prints will not work.
How to DIY Gold Foil Invitations:
I started with one of my new Swell & Grand invitation templates. I customized the invitation at home using Word and printed the design on my laser printer.In this example I am going to use gold foil on the couple's names, so I made sure that those names were printed in a dark black.I then trimmed the design using a paper cutter.Next, I cut a piece of gold foil to size and laid it on top of the part of the image I wanted foiled. The foil will stick to any printed area, so make sure your foil isn't covering any other text.
This is the main factor in the cost of your DIY invitation, the more foil, the more expensive. This amount of coverage allows me to get 25 invitations our of each roll of foil, costing me .30 cents an invitation for the foil.
I then took a regular piece of text weight copy paper and folded it in half. Place your invitation with the gold foil on top inside the paper folder. Place the folder insider the laminator. I had mine on the 5mil, high heat setting. You may need to use the lower setting depending on how thick your card stock is.
The invitation will take about 30 seconds to run through the machine. Finally, open the folder and peel away the foil! I found that smooth paper gives the best foil coverage. The resulting foil will not chip, flake, or rub off.
Check out the video at the top of the post or on Instagram to see it shine. I couldn't believe how easy this was and how well the foil stuck!
I'm glad it was only $28 bucks to pick up the supplies and give it a shot. Until I heard of this method I had been considering the Minc, a $150 foil machine from Heidi Swapp. Besides the expensive price of the machine, the foil sheets are also much more pricey. Using her machine would pretty much negate any cost savings from DIY, so I'm not going to review it.
Sure, the $20 laminator isn't as cute as the Minc - but it does the trick!
I'll break down the final cost for 100 DIY gold foil invitations using this method and laminator for those budget savvy brides out there:
Paper Source Cardstock: .19 cents per invitation
Foil: .30 cents per invitation
Laminator: 19.95
Total cost for 100 invitations including supplies: $68.95 or .69 cents an invitation!


No comments:
Post a Comment