Learn about do it yourself mat kits with expert tips and advice on picture framing in this free video series on art and photography
Friday, February 29, 2008
All About Picture Framing : All About Do It Yourself Mat Kits
Learn about do it yourself mat kits with expert tips and advice on picture framing in this free video series on art and photography
How to build a waterfall, water feature or pond fountain
See how easy it is to build a stunning water feature. Step by step instructions for the BigRock Basalt Falls Water Feature Kit. Do-it-yourself in 2-4 hours! That's why we say "Husbands you can go from ZERO to HERO in just one Saturday afternoon"
Sunday, February 24, 2008
Handicraft Gifts
Handicraft means a skill needing careful use of your hands. By applying this you can create something to produce what you are good at.
Handicraft gifts are one of the special craftwork that someone appreciates. Picture yourself when somebody gives you a handmade gift to you. You will cherish it especially when someone gives you on your birthday celebration. You feel deep down in your heart that you will never forget it on this occasion. Sometimes you feel emotionally disturbed about it.
Handmade jewellery is one of the most outshone jewellery gift that most ladies appreciated. Necklace, rings, brooch, earrings of different sizes, shape and colours form this type of jewellery. The materials used is also quite unique where you can engrave your name if you want it to. Handmade jewellery has a timeless appeal especially in today's high speed tech world, in which crafters and artist are devoting more time to create one-of-a-kind item. Jewellery made of gold, gems, pearls, beads or any material of choice will elicit compliments every time it is worn. The special thought, care and design, flair that go into such a piece made an everlasting impression.
Placemats are a useful gift, appropriate for almost anyone and are easy to create with the help of clear adhesive sheets. In fact, almost any flat items can be replaced between two sheets, with theme possibilities limited only by the imagination.
Decorated gift box offers a wide variety of eye-pleasing shapes to tempt creative hands. This types of pasta, then spray-painted silver to create a one-of-a-kind gift container for a gourmet cook. It makes a wonderful presentation for a kitchen gift.
Nowadays, handicraft gifts are getting popular. It can be very costly depending on the material, originality of the country where the piece inherited.
Anyway, one of the best ways is to purchase these handmade gifts online.
Hi, my name is Rahmat. I have been working as a craftsman for many years. I believe I have a passion for handicrafts work in wood,plastic and metal. Besides that, I like reading, listening to music, and travelling.Last but not least I like to surf the net.
Source http://www.ideamarketers.com/library/article.cfm?articleid=282558
Contact the AuthorRahmat SukiMore Details about business marketing here.
Do-It-Yourself Chandelier Maintenance Tips
Mounted lighting fixtures like chandeliers don't simply add extra glow to any room, as these elegant lighting piecese are more like works of art, and convey a wonderful luster and personality into your home.
Unlike small lamps that can easily be moved around, these lighting pieces are more permanently-placed structures, therefore proper placement is is vital for these fixtures to look and work well.
Whenever you're contemplating on installing these at home, you need to also consider scale. A very small lighting piece will surely look lost in the room, while one that is too large will overpower the space. You should also get the services of an electrician to do the work, as you surely want to avoid a costly error.
How These Should Hang In Your Room
When installing these in dining or living rooms, a chandelier should hang above the center of your table. If the electrical connection in your ceiling is not located within your table's center, install a heavy-duty decorative hook in the ceiling above the center of your table, and then attach a length of chain to bring the wiring from the electrical connection to the hook.
For 8- to 9-foot ceilings, the bottom of your lighting fixture should be around 30 and 33 inches above the tabletop. When installing these fixtures in other rooms, they should be installed higher than 8 feet above the floor in the middle of the room or foyer so that no one would bang their heads on them.
Regular Maintenance Tips
An elegant yet delicate lighting fixture like a chandelier will surely add more glow to your room if it's clean, sparkling and without all that dust and grime. In order to maintain a chandelier's glow, you'll need to have a spray bottle, some cleaning cloths, ammonia, approved cleaning fluids, isopropyl alcohol, masking tape, some sandwich bags and rubber bands. When you have all these in your disposal, here's how to clean and maintain your fixture properly:
- Install alternative lighting nearby, since you won't be able to use the chandelier for lighting while you're cleaning it. Second, turn off the fixture's power at the wall switch. Place a piece of tape over the wall switch so that no one can turn it on accidentally while you're working.
- Cover any upward-pointing bulbs with the sandwich bags, and secure these bags with rubber bands. Place a drop cloth below the chandelier after covering the bulbs.
- Create a solution of one part isopropyl alcohol or ammonia in three parts distilled water. Or, if you don't want to mix your own cleaner, buy a special chandelier cleaner from a lighting retailer. Put some solution in a spray bottle. Spray every component of the fixture with the cleanser, and avoid the wires and other electrical parts.
- Let the crystals drip-dry. If your fixture is too dirty for drip drying, you should hand-wash each crystal with the appropriate cleaning mixture.
- Remove the plastic bags once the crystals have dried, and wipe down the light wells and other noncrystal parts with a cloth dipped in a cleanser.
- Let the whole lighting fixture to dry overnight before turning its power back on.
When choosing a chandelier for a dining or living room, the aspect of scale is vital, as you won't want the lighting piece to dominate a table or look too minute. Measure the width and length, or the diameter for a round table, and note these down so you could be guided when shopping for one.
Vanessa Arellano Doctor
Crystal Chandeliers Lighting Fixtures
Contact the Author
Vanessa Doctor
Lets_J2Top@yahoo.com
More Details about crystal chandeliers here.
Thursday, February 21, 2008
Install Pool Properly to Prevent Problems
Thinking of a do-it-yourself above ground pool install? Pool installation is not difficult, but ensuring that you do it properly is essential to the success of your backyard oasis. This guide, though, should help you install your pool without a problem.
The first step after you've chosen your above ground pool model is to choose the appropriate place to put your pool. Once you've done that, you'll need to begin to remove the sod around the area. Don't forget, installing a pool often requires a license or a permit from your local city council, so check on the building code requirements before you ever pick up a shovel.
When you have removed all of the sod, it's time to start leveling the ground. Start on the high side, and then dig out to the lowest area of your pool building site. While there are a few exceptions to this rule, that will apply to most backyard install pool procedures. The next step is to tamp, or pack the ground into place. Doing this by hand is not going to be effective in most cases. You'll usually need to invest in a bit of equipment for that step.
Once the ground is tamped, it's time to use some crushed stone or sand as a sub-base to help keep your pool level after it has been installed. Your instructions will tell you which is going to work best for your pool. Again, you'll need to tamp it into place before you move on to the next step.
Now it's time to begin to assemble your above ground pool. You'll want to put the bottom of the pool and the supports together carefully. Reading the instruction manual here will really help. Once you have the bottom rim in, putting some ground stakes around it every three feet will help to keep it from moving around as you install the rest of your pool. The walls are your next step. This may require the help of your family or some neighbors, because pool walls are usually quite heavy, and it is difficult to direct them into their tracks.
The liner for your above ground pool is the next step in the install. Pool liners are best put in during warm weather, as the liner material is far easier to work with and less likely to wrinkle on you. Your uprights and the top rail are your final step in the process. Again, your instructions should guide you on what to do first in this situation.
Finally, it's time to put some water in your new above-ground pool. You'll need to fill it very slowly, and soothe out any wrinkles that appear in the liner during the process. If any problems occur, it's best to go ahead and drain the water, then refill it again after you've sorted the problems out.
An above ground pool is a wonderful investment, but ensuring proper installation procedures are followed is essential.
To see the problems with salt water pools, please visit us at ecosmarte. Article Source: http://EzineArticles.com/?expert=Ben_E._Anderson |
The Basics of Sauna Heaters
If you have a sauna, of course, it's not going to be complete without a heater. The heater is what makes it possible for you to relax and de-stress for a while. This is true whether you utilize a sauna at a place such as a health club, or have your own home version. However, technology has made it possible for you to pick from several choices when it comes to choosing the type of sauna heater you want. There are several choices and sauna heaters available weather for a home unit or for a commercial application.
There are several different types of models you can choose from when you're picking out your sauna heater. Each provides its own benefits, and in some cases, consumers are confused as to what type they should buy. Some experts and manufacturers provide tips so that you can choose the best one for your sauna, as well as one that will fit your budget and your needs.
First, decide on the type of sauna you want to use. Do you want an "old-fashioned" one, where you have to use wood to create a hot environment? These are perfect for places that don't have electricity, or for where putting in an electric system would be a lot more work. Some of the places these types of heaters are often used are in vacation homes or in other rustic settings. Some sauna establishments also use this kind of heater, since it provides an atmosphere consumers like to experience.
You can also decide that you want an electric heater. These are usually made of stainless steel or aluminum, so they're very durable. You can install the electric heater in the sauna wall or place it in a corner. You can also usually easily adjust your sauna's temperature with an electric heater, because they usually utilize remote controls that you can use for easy access.
After you decide the type of heater that you want to have, choose your brand. Purchase your heater from a reputable company instead of from a manufacturer who does not have a solid reputation, or whose service is less than stellar. Credible heater manufacturers will sell their products at higher prices, but the quality you'll get will be well worth it. If you buy an inexpensive sauna heater at a low price, it's likely that you'll pay for it n the end with a cheap product that doesn't work as well. In some cases, it could even be hazardous and cause damage to you or your property. Therefore, make sure you keep your health and safety in mind, and buy a sauna heater that is of quality, so that not only will you be safe, but will allow you to use your sauna for years to come.
Thomas Oak writes articles for http://www.hot-sauna.com/ If you are in the market for a new sauna stop and take a look at what new in the world of far infrared saunas and get of all the latest information on new saunas, sauna heaters, steam saunas, sauna kits and steam saunas for your home. Article Source: http://EzineArticles.com/?expert=Thomas_Oak |
Wednesday, February 20, 2008
Keep onions and potatoes fresh - storage tips
by Francesca Clarke
 I am notorious for letting my onions get so old that they start sprouting baby onions. Tempted by the savings, I buy in bulk, but we just don't use them fast enough. Potatoes are the same story. I was interested to learn that with a few simple changes to my storage techniques, I could significantly extend the life of my onions and potatoes.
According to this instructables post, leaving them in plastic produce bags will lead to molding and sprouting. Onions and potatoes should be stored separately in a dry, dark place. Your pantry is probably the best place, but you'll have to make some room by organizing it first. You don't need to invest in storage baskets, simply use brown paper bags. The original post is very helpful, illustrating how to cut down the paper bags for an easy storage solution.
Do you have any other kitchen storage questions? Leave them in the comments and we'll source out the answers for you.
[Via: Daily DIY]
I am notorious for letting my onions get so old that they start sprouting baby onions. Tempted by the savings, I buy in bulk, but we just don't use them fast enough. Potatoes are the same story. I was interested to learn that with a few simple changes to my storage techniques, I could significantly extend the life of my onions and potatoes.According to this instructables post, leaving them in plastic produce bags will lead to molding and sprouting. Onions and potatoes should be stored separately in a dry, dark place. Your pantry is probably the best place, but you'll have to make some room by organizing it first. You don't need to invest in storage baskets, simply use brown paper bags. The original post is very helpful, illustrating how to cut down the paper bags for an easy storage solution.
Do you have any other kitchen storage questions? Leave them in the comments and we'll source out the answers for you.
[Via: Daily DIY]
House Alarm Diy - Tips For Do It Yourself Home Improvement
by Sandra Wilson
A house alarm DIY installation is probably the first thing the true do it yourself homeowner considers when thinking about home security. You just plain want to save the time waiting to have a professional come do the job and want to save some money over having them do it as well. Besides, you think you are a pretty handy person and you want to be the one responsible for having done the job of protecting family and home. But there are some things you will want to think about before you buy your security system.
First, it is important that you talk with your insurance agent to see if they can suggest a certain system or a company that sells such systems. The systems that they suggest should be ones that once installed, the insurance company who provide your insurance cover will be happy with.
However, don’t just run right out and buy a security system off their list of suggested systems. You want to look into other products that just might do the job better for your home and circumstances. Do your own research. Even if the one chosen is from the insurance company’s list, you could find it needs to be done by a professional service. That certainly won’t fit into your plans.
As you do your research, you need to look at as many of the different DIY home security systems as you can. Don’t pick the first one you see that looks easy to install. There are other factors to consider.
It is best if you keep away from the cheaper systems that are on the market as these often do not provide you with clear and concise instructions. Plus the positions in which they require you to locate the various components of the system are poorly planned out.
So take a look at as many of the instructions for the different home security systems as you can as you consider each product on your list of potentials. Look at the diagrams to see if they are clear. Check out the equipment to see if it meets the proper industry certifications.
Another point to consider is that even if a potential DIY home security system on your list has a cheaper purchasing price, it could turn out to be more expensive in the long run. How many cheap things have you bought that have ended up needing to be replaced long before a bit more expensive one would have been? Or even needed more maintenance which could be expensive if you have to call in a professional service to sort out the problems?
Our final point for you to consider is just what tools your home security DIY installation will need. Will the tools the system requires be one time only tools used only to install the system? Or can you use tools you already have on hand for this house alarm DIY installation? If you do need new tools, will you be able to use them for other home improvement projects in the future?
About the Author:
Discover more free tips about DIY home security systems and various individual burglar alarm systems at more website, www.burglaralarmnotes.com.
Source
Drill Press Tips and Techniques
WOOD Magazine's Jim Heavey reveals the simple tricks behind drill press perfection. Learn the tips for setting up, tuning, and using your drill press.
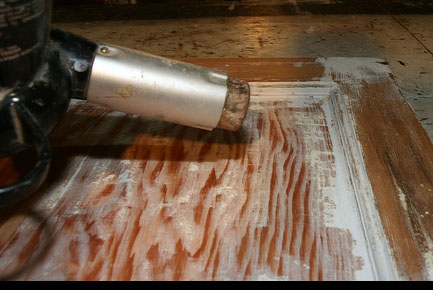
DIY: More Wood Stripping Tips
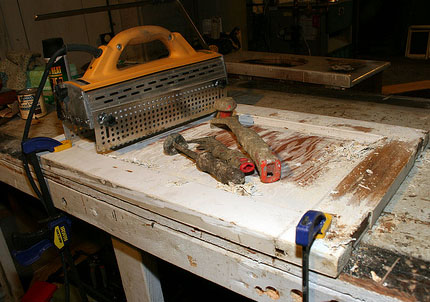
This is a follow up to last week’s wood stripping post. One reader is having a hard time with the SPR and asked for some tips. As I responded in the comments, it’s not perfect, but it is, IMHO, the fastest thing out there.
The reader commented that their SPR only heats up the middle section. I thought it may be possible that this is a faulty unit or the power source isn’t strong enough. The SPR should be used on a 20 amp circuit with a heavy duty extension cord. Anything less may cause the tool to work inefficiently or trip your circuit breaker.
All scraping tools should be clean and sharp. See my tools in the photo? I never clean them. Do as I say, not as I do. Gunky tools will not only take more time to scrape, but they can also damage soft wood.
Make sure you have the right tools for the job. You’ll need pull and push scrapers, both heavy duty and smaller tools for intricate areas. Have some extra blades on hand if it’s a big job. One tool I can’t do without is the interchangeable blade kit. They sell it at Home Depot, etc.
A sawhorse and clamps are important for detached pieces. Do yourself a favor and invest in these items so you’re not leaning over your piece on the floor holding it in place with your knees. Been there. Done that. No fun.
Vacuum the stripped paint as you go along. First of all, you want to get that lead out of there as quickly as possible. Secondly, you don’t want to reheat the same paint you just stripped.
You want to take away most of the paint with the SPR. Don’t try to go back and get corners or you’ll burn the wood. The key is to take the SPR away when you see smoke and bubbling paint. Make sure most of the paint is bubbling or it won’t come off easily. On the other hand, this WILL burn the wood if you leave it too long. It’s something you’ll have to practice and learn for yourself.
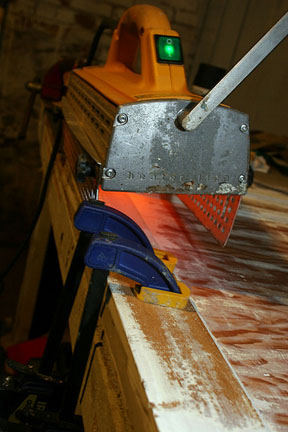
I like to go in with the heat gun and get the corners. You can do this with chemicals as well. I find the heat gun is quicker and less messy. The heat gun can burn wood if left too long. It can also burn your house down. Be careful how and where you use this as it can ignite embers. I was once stripping a piece of molding on the floor and put the heat gun down without using the stand. It was turned off, but hot enough to start a fire. Luckily, I saw the smoke coming up from under the floor boards. I had to rip up that part of the floor to put out the embers.
Once most of the paint is off, you’ll need some kind of chemical to clean it up. Yes, you can sand the rest, but do you really want all those lead paint particles flying around in the air? As I’ve mentioned before, I use the toughest, most toxic shit out there: Rock Miracle. Bad stuff. At this point, if it’s just a little clean up, you can go with something less toxic.
I’ve never tried Removall for full stripping, but it seems to be another option. Perhaps similar to Peel Away, but less mess? Anyone try it? I’ll give it a shot let you know how that goes.
Take proper safety precautions and check your local guidelines how to properly dispose of lead paint.
And don’t forget….neutralize chemicals with mineral spirits or denatured alcohol and sand before staining or painting!
Sunday, February 17, 2008
DIY (Do It Yourself) Aquarium Projects
How To Build it Yourself
Stay in the aquarium hobby long enough, and eventually the DIY (do-it-yourself) bug will get you. You might want to save money, or discover that no shops carry the item you are looking for, or perhaps you simply want the enjoyment of knowing you created it yourself. Regardless of the reason there are lots of resources on the Internet that provide information about a variety of DIY projects.
Before Starting a DIY
Before you jump into creating your own aquarium, stand, or other DYI project, you should be well prepared. First consider why you want to do it yourself. If you are trying to save money make a comprehensive list of all the equipment you will need to build that aquarium or stand. If you have to purchase a lot of tools, the cost savings could vaporize pretty quickly.If you lack the tools but still are set on doing it yourself, check into places that rent equipment. Also consider how much DIY work you might preform in the future. Purchasing tools to build one tank isn't very wise. But if you anticipate having a number of other DIY projects in the future, the cost of the tools might be worthwhile.
Look At The Big Picture
If you are building your own aquarium because you need a custom setup, consider all the other items you will need. Where are you going to find a hood and light to fit the custom tank? How about a stand for it? Unless you are prepared to build all those things, you might be better off going with a standard size so you can purchase the accessories off the shelf.
Lastly, regardless of the reason for your DIY project, do your homework! There are plenty of resources on the net. Research your DIY topic before you start anything. Visit your local pet shop and fish club for advice. Don't get in over your head with a project and end up being a fish out of water.
Where To Find DIY Information
Here's a list of DIY projects available online. If you can't find what you are looking for here, drop me a note and I'll see what I can dig up. Those of you who have done a DIY project, and would like to share your experiences, contact me and we'll get your info published right here.
Aquariums - Glass or Acrylic, from drilling to gluing
Aquarium Stands - A lot less expensive than store bought
Canopies and Hoods - Especially helpful for non-standard sized tanks
CO2 Injection - If you have lots of plants, CO2 is a must
Filtration - A variety of great filter plans
Foods and Feeders - Recipes for foods and building feeders
Misc - Everything from tank dividers to pump silencers to water changers
Saturday, February 16, 2008
Resurfacing Steps and Stairs with Concrete Overlays
I see concrete steps everywhere that are unsightly, cracked and crumbling. This doesn't have to be.
Steps that look like they should be removed can be resurfaced and look brand new. A fairly simple, low construction process.
Cracks can be filled with epoxy filler with sand added. Spalling or crumbling concrete can be repaired with hydrolic cement which dries fast or a patching product with polymer hardner added for increased strength.
Once the steps are repaired a concrete overlay can be mixed with any color and applied to the concrete. The overlay can be smoothed with a Magic Trowel which is a squeegy like tool that is used to spread and smooth the overlay.
Color choices are unlimited. Color can be mixed in the concrete and topically with concrete acid stains and dyes. Dyes will not hold up to UV rays but acid stains will. Integrally colored concrete is the most popular and easiest color solution.
Resurfacing steps and stairs has been very popular for schools and senior centers that need a safety yellow that will not chip like paint. Many are using the concrete overlays in yellow and red to resurface curbs, steps, barriers and sidewalks. The initial cost is more than paint but lasts for years. It's a huge cost savings overtime, it looks great and works.
Graphics can also be easily used with arrows "satey", "caution" or to define a parking space on a parking curb.
Overlays come in various courseness. For interior floors the first coat is typically called course or regular and the second coat is fine. For steps 2 coats of the coarse will help create a non-slip surface.
Once the concrete dries usually at least overnight, sealers are applied with a non slip additive.
The result is a brand new interior or exterior surface that will last for years.
Edward Winslow http://www.decorativeconcretekits.com Article Source: http://EzineArticles.com/?expert=Edward_Winslow |
Using Hot Mud Joint Compound - The "Miracle Mud"
Hot Mud, aka fast set joint compound, or chemically hardening joint compound, is a terrific product for the plaster repair person. And, it works equally well for drywall finishing. It is so versatile, and has so many uses, that I call it my "miracle mud."
That said, it also has some limitations, the principle one being that you have a limited amount of time to use it up before it starts to harden. So ... it takes some getting used to, but once you are familiar with how it behaves, you too will discover what a marvelous product it is.
Hot mud comes in sacks of powder. Depending on the brand you are using, it comes with various time parameters. For example, the product line I use comes in 5 minute, 20 minute, 40 minute and 90 minute varieties. The working time for each is clearly marked on the bag.
Because longer setting times are readily available, a newcomer to using quick set compound can opt for the 40 or 90 minute bags, so he is not quite so pressed for time. It is always a good idea to make smaller batches. You don't want to have to throw partial batches out because your stuff is hardening before you can use it up.
Here's how you mix it. For small projects, I use a small mud pan. When I am doing plaster patching or a small taping job on drywall, I often make a small batch of 40 or 20 minute mud, mixing it right in the mud pan I will be working out of. For my brand of mud, I usually figure that I will get a volume of mud of the right working consistency of about twice the volume of the water I am putting the powder into. With a small pan, when full, I have about a quart of material.
I fill my mud pan about 40 percent full of water, slowly adding the powder and stirring it up with my 4 or 6 inch taping knife. I can usually get the lumps smoothed out before I am ready to use the mud. Mixing a small batch like this takes me about 2 or 3 minutes. I try not to stir the mud more than absolutely necessary, because too much stirring will cause the setting time of your batch to shorten. Now, 20 minute mud becomes 15 or 10 minute mud.
This is also why it is not a good idea to use an electric mixer for mixing larger batches of hot mud. You can cut the working time by as much as half or more.
Why is hot mud so great? First, it can be a huge time saver. You can do one operation, then a few minutes later, after it is hard, go right back over it with the second step in the plaster repair or taping project. Without the setting time feature, you would have to wait 12 to 24 hours for things to dry before you can continue.
Because hot mud contains glue (like all taping and regular all purpose joint compounds), you can use it to glue backing materials in place for filling in holes in plaster or drywall. Hot mud is great for filling gaps and small holes that regular compound can't handle (because it shrinks too much). Once it hardens, fast set mud quits shrinking. You can tape with it, top coat with it, even texture with it - provided you can work within the time restrictions.
Some varieties of quick set compound are harder to sand than others, so I often top my work with regular joint compound.
One caution: every time you finish using a batch of this stuff, you have to thoroughly clean all the tools you used, as well as the mud pans, buckets, etc. Otherwise, the debris left behind on your tools and container will cause the next batch to go off quicker, reducing your working time.
A great cleaning tool are those little orange plastic scouring called Mister Tuffy, if you can find them. Other plastic scouring pads will also work. In general, these work better than scrub brushes. And last of all, you must mix your batches in CLEAN water. Again, to allow you to have full working time.
Now, go do some miracles.
Edwin Brown has been serving clients on the west coast of the US for over 35 years as a plaster and drywall repair and renovation specialist. To get his free email course, HOW TO REPAIR YOUR PLASTER RIGHT, go to http://www.plaster-wall-ceiling-solutions.com/plaster-repair-instruction.html
Article Source: http://EzineArticles.com/?expert=Edwin_Brown
A DIY Project Can Be Fun & Rewarding
With the high cost of buying or building a new home, more and more couples and families are choosing to buy older homes that they can fix up themselves. Just make sure you are the DIY home improvement type of person. While one person may enjoy DIY projects, these may be dreaded words to another. There is the story of the businessman from Singapore that purchased a home in the United States sight unseen because a relative in the U.S. recommended it. When the purchase was final, he was told it was a great older home that just needed some old fashioned DIY home improvement. That was the most dreaded response he could have heard, as he had no construction knowledge whatsoever.
Before you begin a renovation job, review everything that needs to be done in order of importance. While the idea of totally residing the home may seem overwhelming to the novice, repainting or putting in new drywall may be a job you can handle as well as improving the interior immensely. Starting small and simple is the key to getting the job done without getting frustrated and giving up. Many times, we think we need something replaced in our home only to discover we just need to repair or renovate it.
Painting is a large part of remodeling your home both inside and out. It's also a very simple project once you get the hang of what you're doing. If you are the artistic creative type, you can make some great designs on your interior walls that will make the idea of wallpaper unnecessary. This is a great way to renovate a room into a nursery.
Carpentry, plumbing, electricity and heating are major parts of home improvement and home renovations. There are major as well as minor things you can do in these areas. If you're not 100% sure of what you're doing with the heating, plumbing or electricity, don't be afraid to call or professional unless you know something that can help. These are areas where mistakes could be not only inconvenient but also expensive. You don't want to find out that your furnace doesn't work in the dead of winter.
There are many DIY home improvement guides available online as well as at your local library. Many of these will walk you through any project you need done from beginning to end. You can also get some great tips at the home & building supply store where you get your home improvement materials like air compressor, coolers, etc. Between this and helpful hints from friends knowledgeable, you're all set to go. Before you begin any renovations, make sure you check with your local zoning board on any permits that may be required BEFORE you start your DIY job.
Vince Paxton usually creates publications on subjects similar to air compressor and finding good air compressors. His observations on coolers for air compressors can be discovered on http://www.insidewoodworking.com Article Source: http://EzineArticles.com/?expert=Vince_L._Paxton |
Benefits of Soundproofing
Whether you live in an apartment, duplex, condo, or even a house that is not attached to your neighbor you may have to deal with noises coming from the neighbors home, traffic, or even the rowdy kids playing outside. This is a normal occurrence in our every day lives and most of us just learn to deal with this problem. However, if you have had enough and want your home to be your castle and achieve peace and quiet while you are there you may want to consider soundproofing. A matter of fact, you may just wish to soundproof one room in your home so you can enjoy a quiet environment away from your own children to relax, work at home, or sleep.
Many musicians soundproof the room they use for practice to minimize the tone heard from their musician instruments. This is great for musicians, on the other hand, if you work at home you may also enjoy peace and quiet without any disrupting noises entering your workspace. If you have children, you may wish to soundproof their room so they can receive adequate sleep when noises seem to wake them up all the time during the day or night. If you have teenagers that love listening to their music, you may also consider soundproofing their room so you do not have to listen to the same music. All of these are great reasons to soundproof any room in your home.
If you decide soundproofing is the best way for you and your family to achieve peace and quite, then you need to know a few easy ways to accomplish this feat. The most popular way to soundproof is by using noise absorption and noise barriers. Noise absorption is often insulation that is placed between the walls of your home. If you are renting you may wish to talk to your landlord prior to do this since you will have to drill a hole in the walls so you can spray in the insulation. If you pay for this yourself and repair the wall the landlord, will more than likely give you the go-ahead. An affordable alternative to sound proofing is the use of a white noise. Several white noise machines are available on the market today and these sound conditioners have become very effective in sound proofing the home and office.
Noise barriers may be easier to install and can include such things as wood or thick drywall board. Paneling is a great noise barrier that can be added to almost any wall to help reduce the noise levels.
If you are not sure, which would be best you can always talk to a contractor to see what would be best in your situation. Enjoy peace and quiet by soundproofing your home or just one room, the choice is yours.
For more information on white noise machines, check out http://www.sleepwellbaby.com where you can purchase these sound conditioners and other devices for sound proofing and sound masking. Article Source: http://EzineArticles.com/?expert=Melissa_Nathans |
Friday, February 15, 2008
Perpetual Remodeling Syndrome: Laying Ceramic Tile Floors
by Kelly Smith
 Perpetual Remodeling Syndrome (PRS) is brought to you every Thursday by Kelly Smith, who is hopelessly afflicted with this home-altering ailment. Remodeling can be a never-ending and contagious illness, so read on, at your own risk. Don't say we didn't warn you.
For the past few years I've been involved in what I have come to call PRS (Perpetual Remodel Syndrome). Ahh, the joys of home ownership. Since I do enjoy doing home improvement, I feel it's a blessing that my subdivision has no home owner's association. I know the argument; it keeps the standards up. But at least here, there's only one tacky house out of a few hundred.
That being said, today's topic is laying interior ceramic tile floors.Tools for the Project
We wanted ceramic tile in the living room but wanted to keep the carpet until the kid could navigate without falling down. I found that the easiest way to remove the carpet was to pull it off the tack strips, cut it into 5' wide strips, roll them up, and use plastic tape to secure them. Then, I did the same with the padding. Next, use the claw hammer and pry bar to take up the tack strip. If there are any drywall compound splatters on the slab from the initial construction, scrape them up.
Now, to get the slab clean, don't sweep; the dust that has sifted through the carpet is very fine and will go airborne. Use a shop-vac. Eyeball the slab carefully. Minor imperfections are alright but if you have major ones, skim them with thinset.
Do Your Tile Layout
Find the center of the room in both directions and snap chalk lines. Visualize this; the chalk lines will look like a big plus sign with the intersection being in the exact center of the room. These are your "control lines." Be sure that your control lines are perpendicular. Use the 3-4-5 method and adjust as needed.
Now it's simply a matter of measuring back to find your border tiles (taking the grout line spacing into consideration). Once you have the border tile size, snap chalk lines so you'll know where to start laying tile. The lines will be parallel to the control lines so the borders might vary in size a bit as you go down the wall. Don't do all four sides of the room; you only need two walls (intersecting in the corner you'll be starting out of). Leave an exit; don't be like the guy that painted himself into a corner!
Mix the Mortar and Lay the Tile
I used mortar on my floor but there are other adhesives out there as well. Your choice. Spread the mortar or adhesive with the trowel evenly and begin laying the tile using the spacers. I like to lay about two rows of four full tiles on one chalk line and then cut and lay the borders. Then I do the same for the other line. Seat each tile by lightly rapping it with a rubber mallet.
Remember to spread the mortar slightly beyond where the tile will lay so there's no void. Voids cause tiles to crack at some time in your future, drawing displeasure from your spousal unit and casting a shadow of doubt over your impressive DIY skills. Don't go there.
All done? Clean up your tools and have an adult beverage of your choice.
Time to Grout!
Grouting is the fun part. I let the mortar dry for twenty four hours first. Mix the grout using the ribbon mixer again. I know you can buy it premixed, but that's cost-prohibitive for all but the smallest of projects. Start grouting where you started laying the tile if that worked well for you. Arm yourself with the sponge in a bucket of water.
First scoop some grout onto the float and work it in between the tiles (removing the spacers as you go). Then grab your sponge, wring it out, and start wiping the grout off the tile surface with a light touch, and forming the concave shape typical to grout lines. As the tiles dry off, you'll see a glaze on them. Don't worry about that now; you'll wipe it off with cheesecloth later.
Finally, after a day or so after the grout's dry, come back and apply a high-quality grout sealer. Other than nailing up the baseboard, your work here is done. As before, clean up your tools and enjoy an adult beverage. You've earned it!
Perpetual Remodeling Syndrome (PRS) is brought to you every Thursday by Kelly Smith, who is hopelessly afflicted with this home-altering ailment. Remodeling can be a never-ending and contagious illness, so read on, at your own risk. Don't say we didn't warn you.For the past few years I've been involved in what I have come to call PRS (Perpetual Remodel Syndrome). Ahh, the joys of home ownership. Since I do enjoy doing home improvement, I feel it's a blessing that my subdivision has no home owner's association. I know the argument; it keeps the standards up. But at least here, there's only one tacky house out of a few hundred.
That being said, today's topic is laying interior ceramic tile floors.Tools for the Project
- Wet saw
- Scraper
- Notched trowel
- Tile spacers
- Electric drill
- Ribbon mixer
- Utility knife
- Claw hammer
- Small pry bar
- Knee pads (Trust me!)
- Chalk line
- Tape Measure
- Rubber mallet
- Grout float and sponge
We wanted ceramic tile in the living room but wanted to keep the carpet until the kid could navigate without falling down. I found that the easiest way to remove the carpet was to pull it off the tack strips, cut it into 5' wide strips, roll them up, and use plastic tape to secure them. Then, I did the same with the padding. Next, use the claw hammer and pry bar to take up the tack strip. If there are any drywall compound splatters on the slab from the initial construction, scrape them up.
Now, to get the slab clean, don't sweep; the dust that has sifted through the carpet is very fine and will go airborne. Use a shop-vac. Eyeball the slab carefully. Minor imperfections are alright but if you have major ones, skim them with thinset.
Do Your Tile Layout
Find the center of the room in both directions and snap chalk lines. Visualize this; the chalk lines will look like a big plus sign with the intersection being in the exact center of the room. These are your "control lines." Be sure that your control lines are perpendicular. Use the 3-4-5 method and adjust as needed.
Now it's simply a matter of measuring back to find your border tiles (taking the grout line spacing into consideration). Once you have the border tile size, snap chalk lines so you'll know where to start laying tile. The lines will be parallel to the control lines so the borders might vary in size a bit as you go down the wall. Don't do all four sides of the room; you only need two walls (intersecting in the corner you'll be starting out of). Leave an exit; don't be like the guy that painted himself into a corner!
Mix the Mortar and Lay the Tile
I used mortar on my floor but there are other adhesives out there as well. Your choice. Spread the mortar or adhesive with the trowel evenly and begin laying the tile using the spacers. I like to lay about two rows of four full tiles on one chalk line and then cut and lay the borders. Then I do the same for the other line. Seat each tile by lightly rapping it with a rubber mallet.
Remember to spread the mortar slightly beyond where the tile will lay so there's no void. Voids cause tiles to crack at some time in your future, drawing displeasure from your spousal unit and casting a shadow of doubt over your impressive DIY skills. Don't go there.
All done? Clean up your tools and have an adult beverage of your choice.
Time to Grout!
Grouting is the fun part. I let the mortar dry for twenty four hours first. Mix the grout using the ribbon mixer again. I know you can buy it premixed, but that's cost-prohibitive for all but the smallest of projects. Start grouting where you started laying the tile if that worked well for you. Arm yourself with the sponge in a bucket of water.
First scoop some grout onto the float and work it in between the tiles (removing the spacers as you go). Then grab your sponge, wring it out, and start wiping the grout off the tile surface with a light touch, and forming the concave shape typical to grout lines. As the tiles dry off, you'll see a glaze on them. Don't worry about that now; you'll wipe it off with cheesecloth later.
Finally, after a day or so after the grout's dry, come back and apply a high-quality grout sealer. Other than nailing up the baseboard, your work here is done. As before, clean up your tools and enjoy an adult beverage. You've earned it!
2 Easy Projects for First Time DIY Home Improvement
Paint a Room
Painting is by far the cheapest and easiest way to change the look of a room. New furniture, new flooring or other such projects can cost an arm and a leg but paint is around $20 a gallon which can easily be enough for a medium 10 x 10 room.
For your first DIY home improvement projects, buy the paint in the color you wish to have and ask the salesperson at the home improvement store to recommend which finish is best for you. For high traffic areas like a kitchen for instance, an egg shell finish is great because it is easy to wipe clean. For a more serene area of your house, such as a bedroom, a flat, matte finish is a better choice because it can give a more peaceful look to your special area.
After you have chosen your paint, your DIY home improvement plan will need paint rollers more than anything else. Choose a large enough size with which you can easily paint a large W on your wall. Too small a roller will make your DIY home improvement project take forever. A size which is too big for your hands will also impede efficiency. You need not buy special drop cloths if you have any spare fabric lying around at home. You would however want to buy a good painting tape as that will help you get neat corners and save your base boards and door frame from getting paint on them.
Try a new paint effect such as sponge painting, corduroy effect, stone wash etc so that you go beyond the plain wall. If you are hesitant about your DIY home improvement project such as painting, then you can watch a video online or attend a workshop t your local home improvement center, often free of cost.
Update Light Fixtures
If you want to update the look of your home with a simple DIY home improvement project, change your light fixtures. You could either get more contemporary looking lights or you could take down your current ones, tape the glass and then spray paint the metallic parts of the fixture a different color. Always attempt this DIY home improvement outdoors so that you do not have to inhale too many paint fumes.
The light fixtures in your bathroom can also be given a face lift by just changing the bulbs to a more incandescent lighting to give your bathroom a relaxing, dreamy feel. When you need bright light for shaving or make up application, you can make use of a brightly lit magnifying lamp instead of spoiling the ambiance of your bathroom.
http://home-improvement.savvy-cafe.com/2-easy-projects-for-first-time-diy-home-improvement-2008-02-14/
Wednesday, February 6, 2008
To Do-It-Yourself or Not - How to Save On Home Improvement
The first few steps of any home improvement project are about asking a few key questions. What is the scope? What is the budget? Should I attempt to do the work myself? Determining the answers to these questions will save you both money and time on your next home improvement project.
To learn how these three, simple questions will save you money on your home improvement project, keep reading.
1. What is the scope?
Start by having a clear understanding of what you want to do. Essentially, you need to have a plan. If you decide that your only goal is to make cosmetic changes, like new paint or some flooring, then great - you can budget accordingly and probably take on the job yourself.
Meanwhile, if you want to make major structural changes, you can plan out the new layouts. Some builders recommend laying out mock-ups with masking tape and cardboard so you can get a feel for the new space before you commit to it.
2. What is my budget?
This is your most important money-saving step. More than getting a great deal on tiling or saving on a contract hire, planning out a budget and sticking to it will save you the most money.
When budgeting, always pad your figures by about 20 percent to account for unexpected supply costs, hidden expenses and surprise purchases. Don't deplete these reserves unless it's absolutely necessary. Reserve funds tend to dry up fast on large renovation projects.
Finally, save more money with low-interest financing or by paying for the project with cash. Cash is the simplest and cheapest way to fund any remodeling projects - no lenders and no interest.
3. Should I do it myself?
We often think we can save money on a home renovation by doing it ourselves, but our limited knowledge or skills can sometimes cause more damage than good.
Before you grab those tools, ask yourself if you have sufficient understanding of the work involved to take on the project? Do you have the right tools or access to the right tools? Can you do the project safely? Do you have enough free time to get the project done in a timely manner? Are you confident that you can hit an acceptable level of quality? Are you sufficiently physically fit to take on the job? Can you obtain the required permits? And, finally, is this actually something you want to do?
If you can answer yes, to all those questions - go for it. Otherwise, look for a contractor who comes with personal referrals, a stable business, a strong track record and a thorough, itemized price estimate.
For information on practical home flooring recommendations, please visit http://www.home-flooring-styles.com, a popular site providing great insights concerning help with floor renovation ideas, such as Armstrong Vinyl Flooring, Mannington Flooring, and many more! Article Source: http://EzineArticles.com/?expert=John_Rutledge |
*Easy Home Improvement - DO IT YOURSELF

Easy Home Improvement is an online marketplace for the construction & maintenance industry. Individuals submit projects online and service providers provide online estimates for those projects. All you have to do is fill out our simple online form, click submit, and wait for interested service providers to come to you. The best part about their service is that you can compare estimates from multiple companies online. You can also view company profiles and ratings from past customers.
Easy Home Improvement makes the process of finding a service provider faster, easier, and maybe even a little bit fun! By using their service, they do most of the tough work for you. All you have to do is submit your project and check your email for updates.
You can submit any type of project at Easy Home Improvement whether it is residential or commercial; installation, maintenance, or construction; big or small.
From replacement windows to kitchen remodeling, you can receive free consultations, great deals and no obligation estimates from local contractors and companies on all your home maintenance and improvement needs. Getting Free Estimates through Easy Home Improvement is as easy as filling out our online form below. From there, you'll be asked some questions regarding your job. This information is submitted to up to four contractors in your area.
Craft until you can craft no more
By Marilyn Perez
Finally! A how-to craft book for the practical, curious, and “granny-chic” alike and it is brought to you by your new craft guardian angel Mark Montano, of TLC’s 10 Years Younger and While You Were Out. Not only does he have an eye for design, he has infinite ideas for straws, glass plates, ultrasuede, and much, much more. His new book, The Big-Ass Book Of Crafts, is just that; it’s big, it’s colorful, it’s bold, and it is full of ideas that will keep you inspired and excited for a very long time. Here you will find the easiest of projects like "Beautified Matchboxes" to the more complex but fulfilling "Papier-Mache Pedestal Table."
Do we need another instructional craft book? Yes! Mark’s goal in writing this book is to provide a new approach to tapping into your creativity, “I tried to fill the book with projects that anyone could make using items that didn’t necessarily have to go out and invest in. A craft book that could reach across all financial and ability brackets. It’s not Martha Stewart and I don’t want it to be. Let’s just say I’m the anti-Martha. You won’t see her digging through the recycling bin for cans like I do.” In fact, there are a few projects in the book that include items Mark has saved from the curbside (see his "Harlequin & Decoupage Table" on page 100).
Mark comes from a crafty upbringing, “We are a do-it-yourself kind of family. My mother was a painter and poet, my dad also painted and studied architecture and was seriously into sewing! I learned how to sew from my dad.” Mark mentions his family throughout the book, especially his nieces and nephews. He includes plenty of projects for the young and young at heart. The wonders you can do with Elmer’s Glue and popsicle sticks goes way beyond building the crooked cabin you made in the third grade.
While writing this book, Mark was in the process of moving into a new home which became a blank canvas to create new artwork, lighting fixtures, window dressings, and more ideas, may of which can be found in this book. With chapter titles like “I’ve Been Felt Up”, “I’ll Be In The Bedroom (Wink, Wink!)” and “More Stuff To Dust”, Mark brings light and humor to his projects that other books may miss out on. Just when you think you’ve seen it all, Mark presents something with a new twist like his "Pen Flower Arrangements" (page 62) and the gorgeous "Laminated Paper-Doll Window Treatment" (page 176).
Mark is passionate about crafting and bringing out the best in others. He dedicates this book to “all the people who think they aren’t talented or crafty” and he’s confident this book will help those with doubt to find their muse. There are times, and it happens to all of us, where we hit a dry spell and don’t know what to work on next. What does Mark do when this happens to him and what’s his advice?
“Inspiration is a state of mind. What I really like to do is keep a creative journal filled with sketched out ideas of things I'd like to make or paint or sew. When I am not inspired I look at the book and just pick something. It’s like starting an engine. You have to turn the key or nothing is going to happen. I read somewhere that creativity is the ability to mix the memory part of our brain with the current input in your brain and morph it into something new. Pretty cool!”
ABOUT THE BOOK:
The Big-Ass Book of Crafts (Simon Spotlight Entertainment)
by Mark Montano
384 pages
Source
Web Sites Do-It-Yourself For Dummies
A hands-on guide that delivers the illustrated step-by-step directions that Web design newcomers need to create their first site
Illustrated with hundreds of screen shots, including 16 pages in full color, this oversized tutorial guide offers self-motivated do-it-yourselfers a structured, project-based approach to creating a basic Web site. Like the other books in the new Dummies Do-It-Yourself series, it provides readers with a detailed road map for getting the job done, with each chapter taking them one step closer toward the final goal. Readers move from setting priorities, establishing a budget, visualizing the site, registering a domain name, and choosing a Web hosting service to creating Web pages, editing images for the Web, adding multimedia, and testing and publishing the site.
Janine Warner (Los Angeles, CA) speaks and consults on Internet topics worldwide and is the host of the video Total Training for Dreamweaver 8. She is the bestselling author of over 20 books, including Teach Yourself VISUALLY Dreamweaver 8 (0-7645-9998-4) and Creating Family Web Sites For Dummies (0-7645-7938-X).
Source
Home Improvement- Get The Most From Your Home Remodeling Investment
Home improvement projects are not always as investment gains, but then we rarely implement the project on a purely monetary reasons. Most of the time we want to restructure the kitchen or bathroom, garage or convert any other project simply to make living a little “better”. The increase in the value of our homes is a secondary consideration. Nevertheless, this review, and very effective way to enhance the value of the house.
The goal of most projects, housing improvements, tend to add more space and light to an existing room or improve and modernize house or apartment utilities such as a kitchen, bathroom, garage, or heating. Home improvement projects such as these not only preserve or even increase the value of the property, but often add a greater level of security.
Return on Investment - A Quick Reference Guide
The following is only as a guide to help you in which to carry out the project first, if money is a consideration, and several projects are planned.
* Cooking adjustment (minor) in Connecticut = 125%
* Cooking adjustment (large), in Kentucky = 92%
* Wanna restructuring in Oregon = 90%
* Wanna adjustment in Missouri = 96%
* bedroom in Florida is 86%
* Basement restructuring in California = 98%
* Exterior paint in Pennsylvania = 90%
Kitchens - A to start
Kitchen repairs may include issues such as new or re-facing cabinets, counter tops, flooring and appliances. Reorganization your kitchen to improve the workload in the lunch preparations make cooking much more pleasant experience, and add to the attractiveness of your home resale. Obviously, the repair of the kitchen can be a major reconstruction project, but has a lot to do home improvements that can be done in the kitchen. Vinyl laminate floor is ideal for small budget home kitchen improvements.
Bathroom going upscale
If you are trying to increase the value of your home by improving just one room in the house, you may wish to consider, in the bathroom. This is certainly a place where you can take the hint from the current crop of new houses being built. Luxury bathrooms are in vogue. Today, one of the main bath upgrade could, and probably should be one of the most luxurious you make repairs in the house. Particular attention should be paid to the sink and counter top. Your vision, of course, went there when entering a bathroom. Significant improvement store houses such as Lowes and Home Depot can give you just about anything that you can dream today.
Fundamentals - Warnings
Prior to the restructuring of the basement, make sure you have moisture under control. Raw or just wet basements are a problem in many areas. This can usually be easily corrected, professional, but be sure to get several proposals before doing so. Basement moisture control is an area noted for fraud and / or shoddy, unnecessary work.
General
Home improvement is usually done with the intent to add some space to the existing room, or add a bit of light in the room. Keep in mind that building permits are typically required when structural work or home, where the main living area is changing.
Planning and improvement of housing, planning in the event of war, regardless of what your assessment as to the cost and the time it may take longer and cost more than you estimated. Unlike war, however, the improvement of housing is usually worth it. Home improvement is indeed a good investment, production and better place to live and to increase the long-term value of your home.
Summary
Home improvement includes the repair, renovation, alteration, conversion, upgrading or adding to the residential property. It is not an exact science. Any home improvement project must be carefully planned with professional advice when necessary. If you add the cost of your prime consideration of the plan primarily for upgrading the kitchen and bathroom, which offer the best for you to return home improvement dollar.
Source
Sunday, February 3, 2008
How To Make A Simple A-Frame Picnic Table
Standard 6ft "A" Frame Picnic Table
This basic table is tried and true and has been around for many years and as a piece of outdoor furniture it will enhance your patio.. It is very simple to construct and will last for years.
It comes in many different designs. This one is made solely of 2*4 dressed, treated lumber.
Equipment Required
It could be made with a hand saw and miter box however it would be easier with an electric circular saw. ( Or even a drop arm miter saw.)
A hammer. A square. A small hand plane. Adjustable spanner. Tape measure.
A drill with a 3/8 bit. (2 1/2" holesaw)
Materials list
117 ft 2*4" dressed treated lumber (pine)
8 3/8" * 4" galvanized carriage bolts
Approx 110 3 1/2" galvanized flathead nails
Cutting list
1) Seat & table top 14 pieces @ 72" (1830mm) cut square
2) Seat supports 2 pieces @ 63" (1600mm) 60 degrees opposite angles
3) Table support 2 pieces @ 29" (735mm) 60 degrees opposite angles
4) Legs 4 pieces @ 33" (840mm) 60 degrees parallel angles
5) Braces 2 pieces @ 24" (610mm) 45 degrees opposite angles
6) Table cleat 1 piece @ 29" (735mm) 60 degrees opposite angles
7) Seat cleat 2 pieces @ 10 1/2" (265mm)60 degrees opposite angles
Instructions
1) Cut all the lumber as per the cutting list.
2) On a flat surface make up one of the end frames to the measurements in the diagram. Tack it together with nails.
3) Make up the second end frame so that it is a perfect match of the first.
4) If all measurements are ok, drill the 8 holes and bolt the frames together.
5) Stand the frames up with the legs on the inner side facing each other. Place one of the table top pieces on the outside edge and tack in place 7" from the outside edge. Then tack the other outside table top board in place.
6) Check the distance between the legs. Adjust and then tack in place the 2 outer seat boards also at 7" from the end.
7) Check for square. (Measure corner to corner.) Check to see if 8 boards are going to fit on the table top. (Some lumber varies a little in width.) If ok, nail in place all of the table top and the seats so that the 2*4's are hard up against each other.
8) Mark the center of the table top and fit the table cleat underneath. This is on its flat side. Nail in place from the top.
9) Mark the center of the seats and nail in place the 2 seat cleats from the top.
10) Turn the table upside down. You now need to make sure that the end frames are square and vertical. Use your square. Tack a temporary brace to make sure it doesn't move. Now fit the 2 braces. These you have cut to 45 degrees. One end will be attached to the seat support and the other to the 2*4's of the table top.
11) Turn back upright. Nail the braces from the top and the ends as well. Tidy up the furry edges with a hand plane.
12) If you require an umbrella hole you will need a 2 1/2" hole saw to drill a hole in the center of the table.
13) Enjoy.
If you would like more details and illustrations and access to other picnic table plans you could visit our website www.ezpicnictableplans.com
This article was written by Philip Griffith, a successful Company Director with over 25 years experience in a number of different industries. He has been involved in the woodworking related business for over 25 years. One of his interests has been in the design and manufacture of picnic tables. Along with his Father in Law, they believe that they came up with the original concept for octagonal and hexagonal picnic tables in New Zealand. It has turned out to be a very successful concept and can be accessed at: http://www.ezpicnictableplans.com Article Source: http://EzineArticles.com/?expert=Philip_Griffith |
How To Cut Crown Molding - Cutting Crown Molding Tips
Now that you have your crown molding prepped and laid out it is time to cut it to length. The first piece will be square on both ends. Then each piece until the last will have a corner cut on one end and a square cut on the other. You will have a corner cut on both ends of the last piece.
Get the measurements of each piece you will need and rough cut to length about 6 inches to 12 inches longer. Then mark with the number of the wall it is going to be installed on from your drawing. Doing this will help you stay organized.
Next it is time to cut your corners. On inside corners you will have to do a coping cut. Do your cope cuts first then later when you install you can cut to the final length. By doing this if you mess up your cope you can start over since you left at least 6 inches to 12 inches extra.
Outside corners you can do the opposite way, hold the rough cut piece in place and mark with a pencil in place. Before you cut make sure your saw is set up with the miter angle in the right direction and the piece of molding is also facing the right direction. Make some test cuts and save those pieces as visual guides.
You can hold them up in the corners you are cutting next just to make sure your set up is correct. If you cut a piece with the miter angle in the wrong direction it will be to short now unless you leave 12 inches or more of extra.
Cutting inside and outside corners
Basic Miter Saw (no bevel angle)
This is the easiest way to cut your corners. I would recommend cutting your corners this way even if your saw has a bevel on it. As long as your molding is not to wide.
You are going to hold the molding in the saw on the same angle it is going to be on the wall. By cutting crown molding like this all you need to do is adjust the miter angle from left to right. Take a small piece of your molding and hold it in the saw upside down so that top and bottom of the molding sit flat against the table and fence of the saw.
Imagine the fence of the saw as the wall and the table as the ceiling. Now take a piece scrap wood and clamp or hot glue it to the table of the saw as a guide. Now you know when you place your molding in the saw it is sitting at the proper angle every time. Now every cut you make weather an inside or outside corner the molding will sit in the saw upside down (with the cove against the fence).
Brian Kiernan is a master trim carpenter who has had his own carpentry business in Connecticut for the past 15 years. For more information on how to cut crown molding like a pro visit http://www.Install-Crown-Molding.com Article Source: http://EzineArticles.com/?expert=Brian_Kiernan |
Handrail Solutions, Finally a Sturdy, Inexpensive, Handrail System Anyone Can Install
Most of us have been there before. Perhaps you have bought your first house and as winter approaches you realize that steps in the front yard are going to be dangerous when covered with ice and snow. Perhaps an elderly parent is having difficulty traversing stairs and needs the comfort of sturdy hand rail on either side of his entryway. Perhaps the insurance company has asked you to put railing up in order to be insurable. What can you do?
For years most home owners have been reluctant to tackle metal railing installation. They usually settle for wooden railings or employ railing professionals. These haven't always been satisfying solutions. Wooden railings are often four to six inches wide creating a grab bar that may be too large for small or frail hands. Hiring a professional to install metal railing is often cost prohibitive. In more recent years vinyl railing has come along as an acceptable alternative. Still for many homes the look may clash with the traditional established look of brick and metal work accents.
These issues are now overcome through the use of a new steel railing system that uses adjustable posts. The rise and run of your particular stairs are matched by simply adjusting two or three posts--depending on the length--into a vertical position and locking them into place. A variety of installation methods can be used. Rails can be cemented in the ground next to the stair or ramp. They can be cemented into the slab using a rented core drill. Or they can be anchored onto to the stairs using a hammer drill and anchor bolts. In the case of wooden steps lag bolts can be used. Matching wall rail can also be bolted into drywall, plaster, brick or block using appropriate fasteners. You probably already own most of the tools needed and the whole process of installation often takes less time than the research put in the project.
Consider a few things before undertaking the project. Are there any codes you need to meet for the purposes of liability insurance? You may want to contact your local agent. Take a few measurements and determine the length of rail you might need. The most crucial information is to measure the length from the nose of the top step to the bottom step and also count the number of steps not including the top step/landing. With a little effort you can vastly improve the look and safety of your stairs, ramps, and entryways.
Jason Carnley works for Zottola Fab as a website administrator in charge of design and marketing. For downloads of installation instructions or to purchase a rail system explore http://ZottolaFab.com There you will find resources for all your railing projects. We ship standard and custom railing products throughout the United States. Article Source: http://EzineArticles.com/?expert=Jason_Carnley |
DIY With Wood
Over the years I have used wood in a variety of DIY projects in my home. My very first was quite basic and meant me taking up the majority of the floor boards in the upstairs rooms and landing and replacing with brand new. Why? you may ask. It wasn't something I should have had to do but because the central heating pipes were not laid deep enough the floor boards would cause a ringing noise on the copper pipes as you walked over them. So not only did I have to lay new ones I also had to cut channels underneath them so as not to rub on the copper pipes. Now that was a chore.
My next project was much more enjoyable. I would be taking down the old painted paneled banister rail and renewing it with wooden hand rail and spindles, then finishing with stain and varnish. I also had to remove the paint from some of the old hand rail, sand, stain and then varnish that too. It all came to fruition within about three weeks and I was very proud of my handy work when friends and relatives came to visit commenting on how lovely it was, especially when they would ask for the builders name.
Now the ultimate and I would class this more of a hobby than DIY work on the house, would be the natural wooden toys I have made. OK there has only been two so far but it is a start. The first of the natural wooden toys I made was a nineteen hundreds shop with shop counter to the ground floor and living accommodation to the first. The front was made to look like the front of a shop with a little opening door and shop window, as well as the large door to access the whole shop. There were little lights and furniture, the shop owner, his wife and kids. My daughter still plays with it in her bedroom and looking at its condition when she grows up her kids will be playing with it too.
My second but I hope not last of the kids wooden toys that I made was a hobby horse. With the head cut by using a template as a guide, the wood was about 1 1/2 inches thick so all I needed to do was cut the profile then sand it to a fine finish. Before varnishing I bored a hole where its neck finished so I could put the pole with handle into it after gluing. Even with this basic design it looked very professional and the kids still play with it to this day.
If you think some of the wood working projects I have done could be beneficial for you just browse the web sites on the internet as there a lots where you can get plans from for similar types of projects.
Kids Wooden toys are a pleasure to give and make. They will last generation after generation wooden rocking horses Article Source: http://EzineArticles.com/?expert=Jon_Skinkis |
Subscribe to:
Posts (Atom)


